What is Z-Fighting?
Z-Fighting is where multiple objects fight to be rendered closest to the camera (fighting to be on top). This can happen when the objects are overlapping due to having similar z-buffer values as the scene is rendered.
Z-buffer Precision
Sometimes objects may only be flickering when they’re far from the camera too. This happens because the depth buffer renders objects closer to the camera with greater precision and objects at a distance with lower precision.
The precision of your depth buffer will affect how close objects can be before they start z-fighting. You can increase the precision of your depth buffer by simply making your camera near clipping plane as large as possible and the far clipping plane and small as possible.
Increase Z-buffer Precision
Obviously lowering the range of the near and far clipping planes will result in close up objects not being rendered when too close or objects in the distance not being rendered anymore.. It’s down to you to judge good camera values and set them to something appropriate for your scene.
It may be worth adjusting their values at run time depending on the situation too; such as lowering the near clipping plane indoors or increasing the far clipping plane when looking through binoculars etc.
How can Z-Fighting be fixed?
There’s multiple approaches you can take to fix z-fighting in your Unity project and some options will work better in some situations compared to other.
- Physically move the objects further apart
Simply increasing the distance between the fighting objects should fix z-fighting in most cases. This is the most obvious solution but sadly not always possible depending on the situation, but if it is then always try increasing distances between objects if there’s no disadvantage from doing so!
- Increase the near clipping plane and decrease the far clipping plane of the camera
The lower the range of your camera clipping planes the more the depth buffers precision isn’t wasted. It may be worth changing these values at run time too, such as increasing the far clipping plane and near clipping plane when looking through binoculars.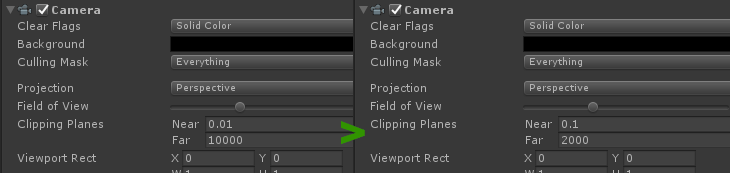
- Nudge the shader depth offset to force an object to be rendered on top
Sometimes you may want an object inside another object but still want one forced on top. (such as graffiti on walls, dirt on ground etc) In these cases you can adjust the shader offset. This will offset the rendering of the rendered object without physically moving the vertices.Offset takes 2 parameters; factor and units which are summed to calculate the depth offset.
– The factor parameter scales with the slope of the object in screen space which means you’ll see the offset affected when viewing the object from an angle.– The units parameter scales with the minimum resolvable depth buffer value meaning as the depth buffer becomes less precise the value will increase preventing z-fighting.
Use negative offset values to pull the rendering closer to the camera, for example “Offset -1 -1” will pull the offset closer at an angle or directly on where the depth buffer precision is harsh. (Note that some older mobile devices may ignore the factor offset parameter so in these cases you may only be able to rely on setting a larger units value!)
- REALLY force an object to be ALWAYS rendered on top
You may just want to force some objects to always be on top of everything else. In these cases you should set the ZTest property to Off inside your shader, this will make it ignore the camera depth and instead just render based on the render queue order. (Render queue can be set within the shader or directly from the Render Queue property on your materials.I go into more detail explaining the render queue under the frame debugger header in this post: https://www.unity3dtips.com/unity-batching-dynamic-vs-static/)
Need more in depth information?
For more information regarding Unity shaders and controlling depth, check out the cull and depth documentation: https://docs.unity3d.com/Manual/SL-CullAndDepth.html
If you want to read more regarding the shader offset parameter which I found hard to track down more information about check out the OpenGL offset wiki page at https://www.khronos.org/opengl/wiki/Parameters_of_Polygon_Offset or this OpenGL specifications page which goes into a lot of detail regarding depth offset http://docs.huihoo.com/opengl/glspec1.1/node58.html


THANKS SEAN
Great post on fixing Z-fighting in Unity
I get these issues persistently when running Unity builds in linux when the same projects windows build looks perfect.
Is anyone aware of why this would happen on a linux build but not on the windows build? Is there some opengl setting that must be tweaked to resemble how direct x deals with such rendering issues?
Like the author of this thread I have encountered the same in my work. Developed a simulator on windows and have been switching over to ubuntu 18.04 LTS for a variety of reasons (which Unity officially supports). On 4 different computers now I have seen horrendous terrain flicker when I never saw any in months of dev on windows. I have tried starting the editor with the command line arguments:
-force-opengl
-force-glcore
-force-glcoreXY: XY as 32, 33, 40, 41, 42, 43, 44 or 45
and the above with -force-clamped
Have also tried forcing the vulkan API. None of these options have fixed the bug. Any advice on getting around this WITHOUT modifying the shaders (which work perfectly on direct x clearly) would be appreciated.
Increase the near clipping plane , Work for me , Thanks
Increase the near clipping plane. It works.