Unity iOS & Android Texture Compression Guide Overview
Unity texture compression is a very important step to developing mobile games for android or iOS. Keeping the filesize of your game build low means players are able to download the game faster and some may even abandon the download if it’s taking too long!
This guide explains how to do unity android texture compression as well as unity iOS texture compression and also explains other texture optimization techniques to improve unity mobile rendering performance!
Why Should I Compress Unity Textures?
Textures are generally the main cause of high build filesizes, especially when you have a lot of textures at higher resolutions! Texture compression in Unity allows you to reduce the filesizes of your textures and in most cases makes no visual difference!
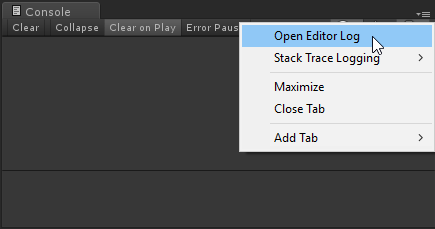
You can find out exactly what’s causing your build filesizes to be so high with the Editor Log. After making a build open the editor log from the dropdown menu top right of the console (Open the console from Window > Console) (Alternatively on windows it can be found in %localappdata%/Unity/Editor/)
In the editor log search for ‘Used Assets and files from the Resources folder, sorted by uncompressed size:‘. Below this line is a list of all assets included into the build ordered by their filesize.
From here you can go through the assets and determine what you can do to compress or remove some of these items. This guide explains how you can compress the images (Textures) from this list.
Viewing the Target Texture Import Settings
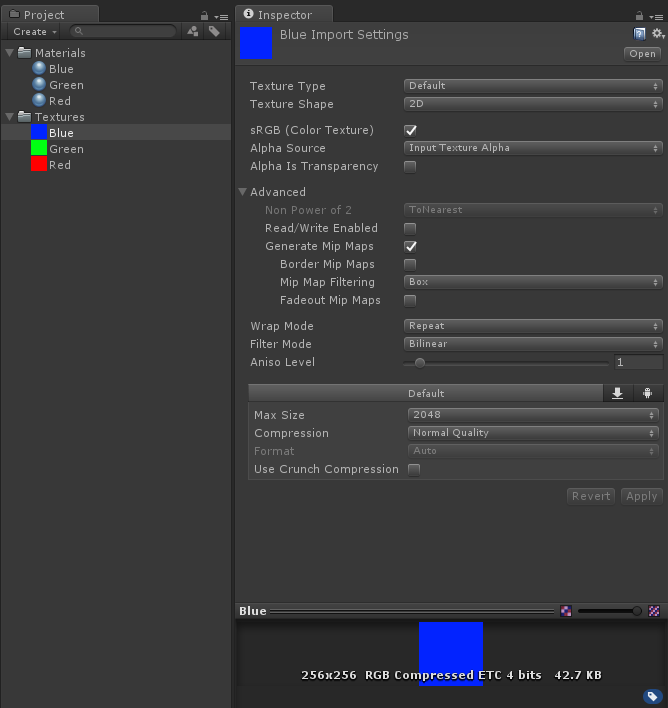
Unity texture import settings can be adjusted by selecting the texture in the project window to show the texture import settings in the inspector window.
From the texture import settings you can set texture compression, control mip-mapping and adjust few other useful texture settings.

(If you don’t have the project window or inspector window visible you can add them from Window > Project and Window > Inspector and if selecting objects from the project window isn’t showing the import settings try pressing the lock icon top right of the inspector)
With your texture selected you’ll want to select your target platform and tick the override checkbox (In older versions of Unity you could just set the compression format from the default tab to affect all platforms, however this was changed in later versions of Unity 5. – Note if you’re using an older version of Unity you need to set the Texture Type to Advanced before you are given the option to select specific compression formats rather than just automatic)
Unity Texture Compression Options
Max Size
This will set the maximum resolution allowed for this texture, e.g if your texture is 3000×3000 setting this to 2048 will set the texture resolution to 2048×2048, if the original texture size is smaller than the selection e.g 2000×2000 then setting this to 2048 will not affect the texture resolution, keeping it at native file resolution.
Compression
This is found in the default tab and seems to be the replacement for auto compression from the older versions of Unity. I recommend keeping track of your textures and manually setting the unity texture compression where possible.
Auto compression may be good enough if you’re feeling lazy, however I personally have never seen a difference between low, medium and high quality levels visually or filesize-wise so I’m not entirely sure what difference they make.
Format
The texture compression format which the texture will be compressed with. You should try stick to a specific format across your entire project to ensure you don’t run into compatibility issues.
On Android when a compression format isn’t natively supported it’ll switch to software decompression which is MUCH slower. Usually for Android you’ll want to stick with ‘ETC2’ texture compression formats, using ‘RGB Compressed ETC2 4 bits’ for opaque textures and ‘RGB + 1-bit Alpha Compressed ETC2 4 bits’ for transparent textures.
However if the textures appear glitchy or transparency stops working then use ‘RGBA Compressed ETC2 8 bits’ which results in a slightly higher texture filesize but should fix any issues with the texture.
Compressor Quality
Visible after selecting some compression formats. This sets the level of compression between fast, normal and best – I have never personally seen any texture changes in filesize or visual quality from setting this on any compression methods other than crunched (which will degrade the texture quality)
Note that setting best on some textures (usually textures with transparency) causes Unity to hang for a long time, so you probably should just leave this set to ‘Normal’ unless you are using a crunched compression format or have some other reason to change it.
Mip Maps
What Are Mip Maps?
Mip maps are smaller versions of the original texture which are used instead of the actual texture when the rendered object is far away from the rendering camera.
They improve GPU rendering performance as the GPU renders much smaller textures and can also reduce texture aliasing without anti-aliasing being needed.
How To Use MipMaps
Under the Advanced section of the texture import settings is a checkbox to ‘Generate Mip Maps’ this will generate the smaller versions of your texture to be generated and built into your game alongside the full sized texture (You can preview mip-maps with the mip-map slider).
Rendering the smaller mip-map textures which are used at a distance is much faster for GPU rendering and reduces harsh aliasing at a distance, especially when used with anisotropic filtering.

This example uses strong colour contrasts to make the aliasing effects more obvious but you can see how mipmaps and different filtering levels affect rendering.
Note that generating mipmaps increases the total filesize of the texture by about 25% so if you’re trying to keep filesize low and either the texture looks fine at a distance, will never be viewed at a distance or GPU rendering costs aren’t an issue then you can keep mipmaps disabled to reduce game filesize.
(Make sure Anisotropic Textures are enabled in your Quality Settings if you want to filter your textures!)
POT Textures
What Are POT Textures and NPOT Textures?
POT & NPOT stand for ‘Power of Two’ and ‘Non Power of Two’.
A POT texture is where a texture has a resolution of 2^n x 2^n (which means the height and width is either 1, 2, 4, 8, 16, 32, 64, 128, 256, 512, 1024, 2048, 4096.. etc).
NPOT is the reverse of this, a texture which does not have a height/width which is a power of 2.
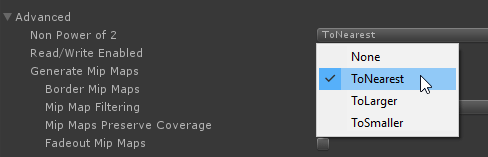
Only POT textures can be compressed if mipmaps are enabled
If you’re trying to compress a NPOT texture with mipmaps enabled Unity might warn you that ‘Only POT textures can be compressed if mipmaps are enabled’.
You can either directly edit your texture or use Unity’s built in texture import settings to force squash or stretch the texture to be power of two.
Expanding Advanced there’s an option for ‘Non Power of 2’ this will allow you to make Unity slightly squash or stretch a texture to the nearest power of 2.
The reasons why POT textures are important is because unless the texture is POT you won’t be able to use some compression formats and mipmaps cannot be used on the texture.
(On old hardware you may find that NPOT textures use more memory than expected too as they’re being stored into memory as next highest POT sizes!)
Additional Tips
Remember that not all textures will be equally visible in games, some textures may never even be visible up close! In cases where textures won’t come close to the camera you could probably bring your texture resolution down to a lower level and enabling mipmapping to improve render costs.
If you’re developing a mobile game you try also try not to go over the top with level of detail! On small mobile screens detail won’t be as visible as it is in your editor screen so consider bringing resolutions lower and previewing them on a phone or tablet.
I also always suggest using texture compression on ALL your textures! There should be a compression method which works for you in all cases without any or very little visual change.
Having GPU performance issues? Check out my previous guide on how and when to use dynamic and static batching in your games! https://www.unity3dtips.com/unity-batching-dynamic-vs-static/
Want to learn more about the specific texture compression formats? Unity has a guide in their docs which you can check out here: https://docs.unity3d.com/Manual/class-TextureImporterOverride.html

Fantastic p
Hi, I and my team has made a tool to change the NPOT texture to POT texture. However it’s just released, and it’s free. It helps in reducing Memory on Android and IOS. Also disk space in your project. Check it out and share it with your fellow Unity developers. http://bluecreazione.com/imageprocessor/
THank you very much for the anroid specific texture compression info
Hello! Thanks for writing the post! I have a serious issue after upgrading an old project to Unity 2020 and above.
Original Textures are only 412mb, total Scenes 200+mb and the Sounds 72+ mb.
In 2019.3, the exported 200+ mb abb file unpacks into a 700mb folder which is expected.
In 2020 and above, the abb became 500+ mb and unpacks into 2.0+ GB folder. The difference It is quite baffling.
I have yet to find a solution. I truly hope you can answer this mystery that has been boggling me for weeks. No one at the Unity forums are responding to my cry for help so far.