Getting Started With Unity Android Game Development!
This guide will help you prepare your Unity installation, projects and android device for developing Unity Android Games! Looking for more Unity tips? Check out our other Unity how to guides here!
What you’ll need to get started for Unity Android development
Micro USB cable or other data cable compatible with your device (must have data capabilities!)
Steps to setup your Unity Android Build Environment
Download the Android SDK The easiest way to install the android SDK is to simply download Android Studio, it’s a useful Java IDE and the installer sets up the android SDK and other environment variables for you! (If you’re an advanced user and just want the command line tools then you can download it separately at the bottom of the page and use the sdkmanager to install packages separately.) Make sure to keep note of the android SDK location during the installation as you’ll need it later!
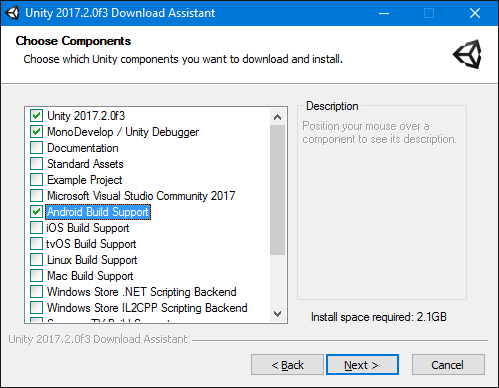
Install Unity (With android build support) During the Unity installation you’ll be asked which features you want included with your Unity installation, make sure Android Build Support is checked!
Launch Unity and either create a new project or open an existing project If you’re planning on converting an existing project into an android project make sure you make a backup of the project beforehand!
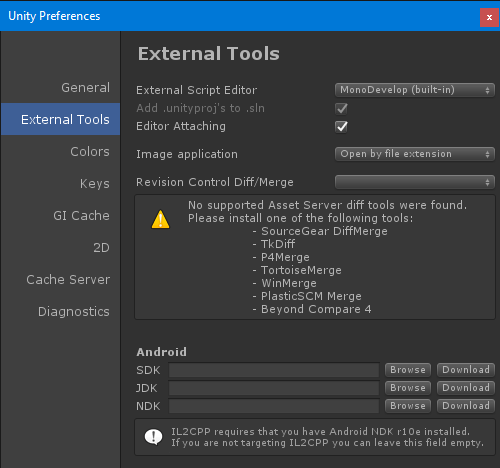
In Unity open Edit > Preferences… and select External Tools from the sidebar At the bottom of the external tools unity preferences tab you’ll see a sub-heading for ‘Android’ with 3 empty boxes.
Set the path for the Android SDK and JDK The SDK was installed during step 1 (if you installed Android Studio this path was set during the the installation). If you can’t remember the android SDK location check for a folder named ‘Android’ inside %localappdata% and set the path to the folder named ‘android-sdk’ inside that folder. (e.g: C:/Users/<Name>/AppData/Local/Android/android-sdk/)
If you still can’t find the android SDK location just run the android studio installer again to find the path where you installed it to.
The JDK will most likely be installed into C:/Program Files/Java/jdk<VERSION_HERE> but again you can repeat the JDK installation if you can’t find it.
Switch your Unity project to an Android Project If using an existing project, backup the project now! Most of the project files will be re-imported which can take a VERY long time in large projects!
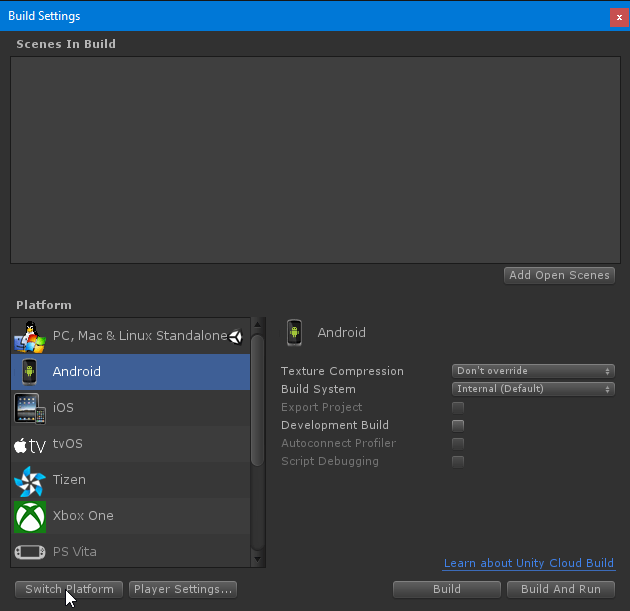
From File > Build Settings… select the Android platform. Then in the bottom left corner of the build settings click the Switch Platform button. (If you don’t have the android platform shown in the build settings then you didn’t tick the Android Build Support checkbox during installation!)
Set your Player Settings Before you can build you’ll need to set a package name, company name and product name. You can also create or use a keystore now too but for testing purposes an unsigned keystore will be fine.
Build the project You can build from either the build settings (File > Build Settings…) or directly from File > Build & Run. From the build settings you the following options:
– Texture Compression (Force the texture compression method) – Build System (Change the build system) – Export Project (Export a java project to work with in android studio) – Development Build (Development builds allow the use of the profiler & frame debugger) – Autoconnect Profiler (Automatically connect to the profiler when the app is launched) – Script Debugging (Logcat messages have more detailed information)
Automatically Build and Launch on Android Device
The Build and Run options in Unity will automatically build the APK to a device connected via USB and launch the app when completed.
However first you need to ensure developer mode is enabled on your android device!
How to enable Android Developer Mode
On your android device open Settings
Scroll down and select About Device
Select Software Info
Find Build Number and repeatedly tap it After tapping Build Number a few times you’ll see a toast message appear telling you that developer mode has been enabled.
With developer mode enabled, when you try to build and run with your android device connected you will be prompted to accept the USB connection on the android device (there’s a tickbox to remember your computer in future too) select yes and when Unity finishes building your app should automatically launch!
What Next?
Now that you’ve successfully setup your environment and can build Unity android games, you can now continue development. One important aspect of android development is optimizing your game for the wide range of android devices out there!
Reduce filesize & optimize mobile GPU performance!
The size of your app is very important with mobile games so you might want to check out our guide on Unity texture compression, it explains the different types of compressions as well as tips on reducing filesize and optimizing mobile GPU performance to increase the speed of your app!
Improve performance with static and dynamic batching & learn how to use the frame debugger!
Reducing the number of rendered batches is very important for mobile optimization! Check out our Unity mobile batching guide to learn how you can heavily increase the performance of your android games!
9 Comments on “Getting Started With Unity Android Game Development!”
Hi! Do you know if they make any plugins to assist with Search Engine Optimization? I’m trying to get my blog to rank for some targeted keywords but I’m not seeing very good gains.
If you know of any please share. Appreciate it!
Well your comment is pretty unrelated to Unity but I can help I guess.
Try writing some unique posts about topics which don’t already have hard keywords to rank for, for example trying to rank for “Age of Empires Cheat Codes” is going to be next to impossible until your site is getting some traffic already due to all the other sites you’ll find on Google.
If your also using wordpress check out the Yoast SEO plugin, it’ll help you write your posts to target keywords whilst also helping you make them easy to read for your visitors.
Once you have some posts you’re happy with try get some sites to link to your site, either sharing blog posts on various subreddits or forums etc discussing the topic of your site already – just make sure not to spam you website everywhere randomly..
Paying for advertising might also be useful too, but you should carefully monitor what the traffic you’re getting from the advertising is doing. If they’re instantly leaving then the page you’re advertising either has issues (too hard to read, complicated design etc) or you’re just focusing the wrong audience with your adverts.
Unrelated to Unity but it’s nice to get a comment on one of my posts :p
Hope this helps!
This guy has something very important to say!
Quality articles is the secret to be a focus
for the users to visit the website, that’s what this website is providing.
It is not my first time to pay a quick visit this website, i am visiting this web page dailly and
take fastidious facts from here everyday.
I really can’t believe how great this site is. Keep up the good work. I’m going to tell all my friends about this place.
Awesome article post.Much thanks again. Want more.
Saved as a favorite, I love your website!
thanks.