There’s many ways to move objects in Unity and this guide explains how and when each option is best used.
This guide focuses on setting object positions. Rotation and scale are only briefly mentioned but still give a basic overview allowing you to manipulate them too!
Transform Component
All game objects in Unity have a transform component. This is used to store the position, rotation and scale of your object. The transform can be read to get this information, or can be set which will change the position, rotation or scale of the game object in the scene.
You can interact with a transform component in a script by either directly assigning a Transform to a variable or if you have a Game Object variable you can access the transform component with myObject.transform.
Setting the position of a transform overview
Once you have a variable referencing the target transform there’s a few ways you can move it. These methods are explained in more detail below!
Directly set the position property to change the world position of the object.
Directly set the localPosition property to change the local position of the object.
Use the translate method to move the object a certain direction and distance.
Attach an object to another object to be moved as a group. (parenting)
Directly moving a transform to a world position
The world position is a location in the scene which is always the same, no matter where your gameobjects are or the depth of your objects. For example X:0, Y:0, Z:0 will always be the same position in the center of the world.
To set the world position you use the position property and simply set it to a vector3 type.
transform.position = new Vector3(120f, 50f, 45f);
This example will instantly move your object to X:120, Y:50 and Z:45 in world space. It sets the position of the transform to a new Vector3 variable (which is a variable type which stores X, Y and Z coordinates used for positioning in 3D space) and we’re initializing the variable with the defined X, Y and Z values.
If you’re wanting to slowly move objects in unity into a position rather than instantly teleport then check out this guide which explains lerping and interpolation in more detail! https://www.unity3dtips.com/unity-fix-movement-stutter/
Directly moving a transform to a local position
Before explaining more about local positions you need to understand how depth, parents and children work in Unity. The local position is a position which is different depending on the location of the parents. (which allows you to do movement within a separate space, such as moving an object inside a moving spaceship without recalculating position based on the spaceship position)
To set the local position of an object similarly to setting the world position you assign a vector3 value, however this vector3 is relative to the center of the object parents rather than the center of the world.
transform.localPosition = new Vector3(120f, 50f, 45f);
Using the car hierarchy example from above as an example, if we were setting the localPosition of the ‘Parts’ object here and the parent ‘Car’ object was positioned at X:50, Y0, Z:0 in world space then our ‘Parts’ object would end up being positioned at X:170, Y:50, Z:45 in world space.
How Unity depth works (parenting and child gameobjects)
In your Unity hierarchy gameobjects can be put inside each other (either by directly dragging them on to each other or via scripting). An object inside another object it is called the child and the containing object is called the parent. (and the process of moving an object inside another object is called parenting)
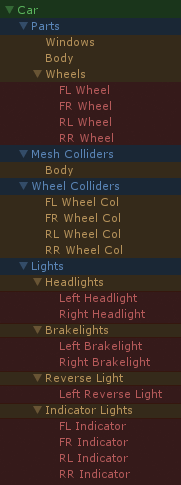
Explanation of a colour coded screenshot of a Unity hierarchy for a car
The lowest depth; depth 0 is marked with green. This is the root of our car and all other objects used with the car are children of the car object. If we moved the car around the scene all the children will move with it too.
Depth 1 gameobjects are marked in blue. In the example they're being used to sort the different categories of components the car needs. This is useful to keep the hierarchy clean so it's easier to work with as well as allowing you to move, rotate, scale or disable each of the object groups (for example if you wanted to completely disable lights for the lowest quality setting in your game you could just .SetActive(false); the Lights gameobject.
Depth 2 are marked in orange. These objects are used as some of the final depths in some cases but where there's multiple objects which should be grouped together I decided to use them as another grouping object to keep the hierarchy organized.
Finally depth 3 are marked with red. These are objects which are/could be multiple similar objects placed at different positions on the car. I could have taken the depth even further too if I wanted to group objects even further such as having front and rear lights in their own groups too!
Moving an object with the Transform Translate method
The translate method allows you to move an object based on direction and distance. You can also set whether you want to move in local or world space with the second Space parameter.
The main parameter of the translate method is the translation which is a Vector3 value defining how much your object should move from its current position.
First you need to know which direction you want to move in. You can either use a world direction such as Vector3.forward, Vector3.right or Vector3.up or a local direction relative to an existing transform such as myTransform.forward, myTransform.right or myTransform.up(Use a negative value to reverse the direction, -myTransform.forward is backwards relative to the object for example)
Once you have the direction you want to move in you then need to multiply it by your distance.
myTransform.Translate(myTransform.forward * 10f);
This will move the target transform forward by 10 meters.
Rigidbody Component
Rigidbody components are used when you want to give your objects physics. You add them manually in the inspector by adding the rigidbody component to a gameobject and reference them in scripts by either assigning a public Rigidbody variable or by calling GetComponent<Rigidbody>() from the gameobject or transform which the rigidbody component is attached to.
Directly set the rigidbody position
Similarly to setting the transform position, rigidbodies have position and localPosition properties which will directly move the object into world or local positions. HOWEVER this isn't just a shortcut to setting the transform position! It uses the physics engine to set the position of the rigidbody and will update the transform position in the next physics update. You can read more about physics and timesteps here: https://www.unity3dtips.com/unity-fix-movement-stutter/
Using the rigidbody MovePosition method
The rigidbody MovePosition method uses the interpolation mode set on the rigidbody to move the rigidbody into the requested position over time, generally you would call it per FixedUpdate() and the value would change per frame with a value similar to how the transform translation method works.
This will move the target rigidbody forward by 10 meters. Realistically the 10 value here would be multiplied by deltatime to gain a smooth movement, for more information check out this guide which explains this in more detail: https://www.unity3dtips.com/unity-fix-movement-stutter/
Using the rigidbody AddForce method
Adding force to a rigidbody works like you might expect by adding a thrust in a certain direction. Note that if your rigidbody has gravity enabled then your force will be fighting against gravity.
This will add an acceleration force to the rigidbody which is affected by the mass of the rigidbody. The force is being applied in the forward direction with a strength of 10.
Force modes
ForceMode.Force - This will accelerate in the target direction and also taking the mass of the rigidbody into account. (higher mass = heavier)
ForceMode.Acceleration - This will accelerate in the target direction but will ignore the mass of the rigidbody.
ForceMode.Impulse - Adds an instant force to the rigidbody cancelling out any accelerative force, this also takes the mass of the rigidbody into account.
ForceMode.VelocityChange - Adds an instance force to the rigidbody cancelling out any accelerative force, this will ignore the mass of the rigidbody.
Acceleration force applied to an object will get stronger as more force is applied - set the drag of your rigidbody to allow your rigidbody to lose force over time!